iOS Social Gaming Tutorial
Introduction
Social gaming is getting more and more frequent, as social features can greatly increase the addiction and fun factors of mobile games. While there are several frameworks that allow different user interactions (such as Game Center, Open Feint, etc), it can be hard to interact with your own friends on these. That's where the Facebook SDK comes in. By allowing the user to challenge and play against their own friends (even those who don't have an iOS device), the competition factor really elevates and makes the entire thing way more interesting. These facts obviously haven't gone unnoticed and today, it is possible to find many applications (whether games or not) that make use of the Facebook SDK for content sharing, marketing and increased achievements.
Examples
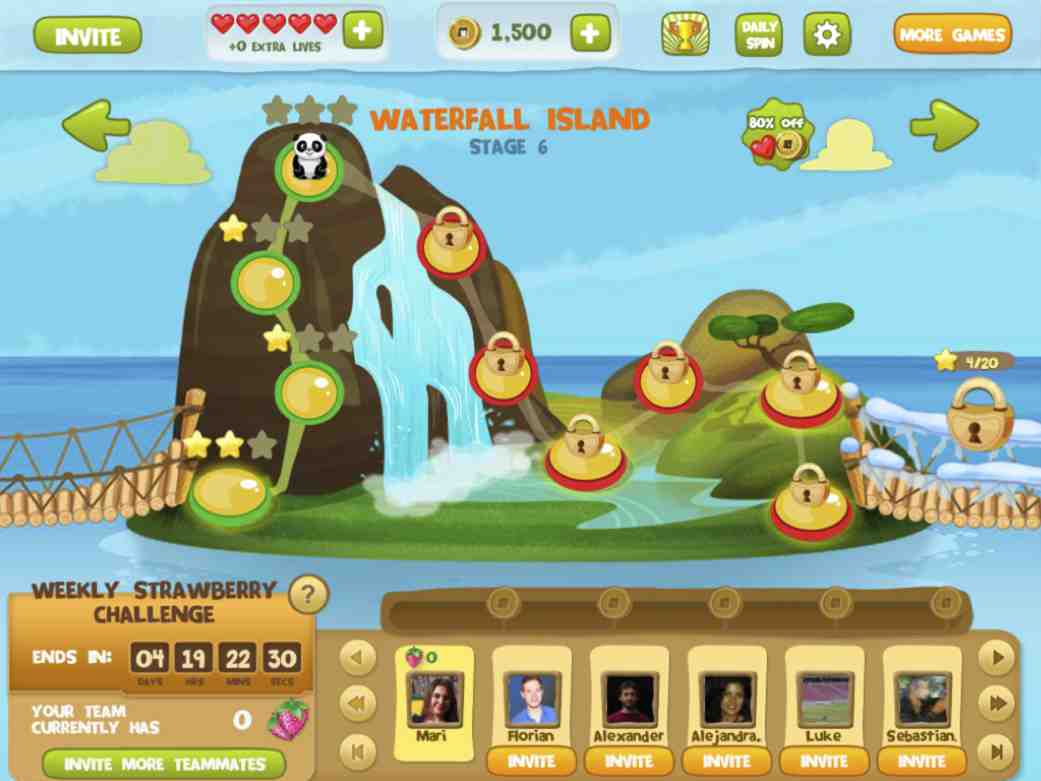
Panda Jam uses the Facebook SDK to help users get more points. The more Facebook friends a user shares his story with, the more points he will become, and these points can then be used to buy extra features in the game.
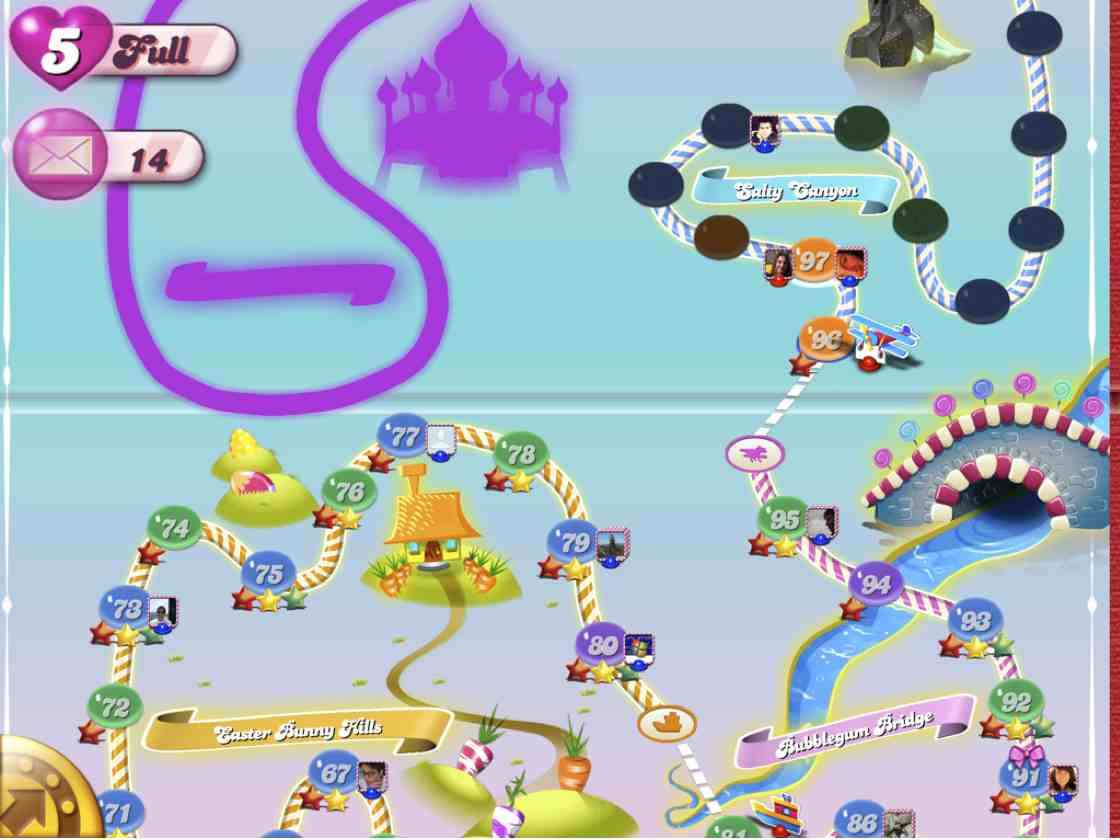
Candy Crush Saga is a good example of an application that has the Facebook SDK deeply integrated. After playing the initial levels (and already getting somewhat addicted to the game), a user can only progress by either receiving help from their Facebook friends, or by buying a pass. Since no one wants to spend money, the users usually end up sending requests to their friends, which greatly helped the game marketing.
General Information and Comparisons
As of March 2013 Facebook had over 1 Billion users, which makes the potential reach of your application or game very big when correctly used. Obviously not all of those users have iOS devices, which means that apps that are integrated into Facebook should, ideally, be provided for many platforms and should necessarily have a web interface. This is because when something is posted though your app the user will get redirected to a previously defined URL, which, in case the user has your app installed, should open it, but otherwise (when your app isn't available in the device) following the URL should be able to redirect the user to at least a website. This is one of the main differences between using the Facebook SDK and, for instance, Game Center. While the Apple provided platform is very good for iOS users, it makes the entire competition very platform specific, loosing some potential clients. Furthermore, as Game Center is mostly based on Score concepts, it isn't recommended for non-game apps, and it also lacks the afore mentioned linking concept (more on Deep Links in session). On the other hand, as Game Center users only get updates from games he has already played, the probability that a user will get annoyed with incoming requests is way smaller. That is one of the biggest problems with Facebook integrations. If over used, users can easily get annoyed with too many incoming notifications, leading them to not like or even uninstall the application.
Installation and Configuration
After you have decided to work with the Facebook SDK, the first thing to do is to set up your project. In order to do this, you will need a Facebook Developer account, and then you can go to the Facebook Developer page and click on Create New App. Upon which, you should receive a screen similiar to:
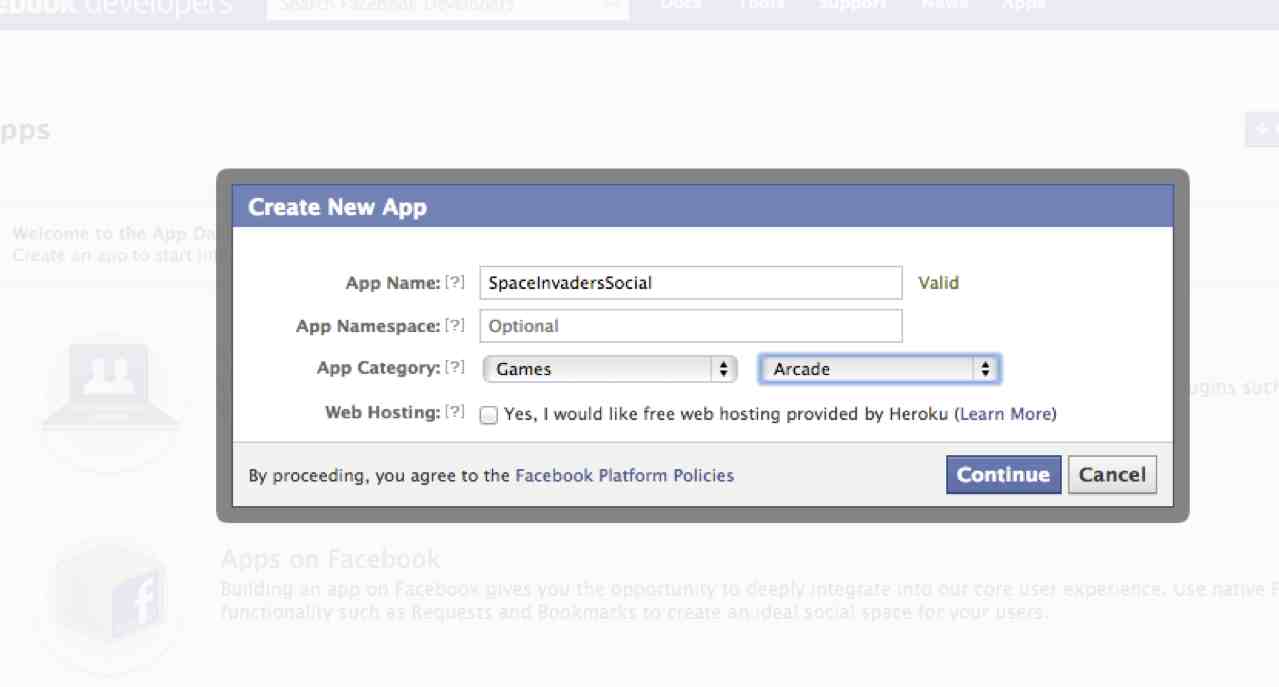 This will lead to a configuration seen, where several important things need to be set up. You first need to enable your app for Native iOS, and should also set up a App on Facebook.
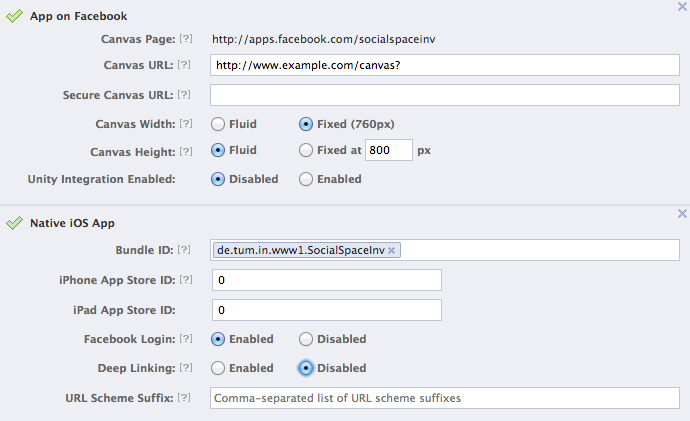
Under "App on Facebook", provide a canvas URL for your web interface. Any sent requests will get redirected to this URL.
Under "Native iOS App" set up your Bundle ID exactly as it is in the XCode project. Also don't forget to enable Facebook Login. In the end you should have something similiar to:
Configure everything and save it. Facebook should then provide you with a App ID and App Secret on top of your screen, as see you see below.
 Note down these ids!! For now, this would be it for the web part. Now we need to set everything up in XCode. First of all, you might want to check if your bundle identifier (under XCode Project > Select your Target > General Tab > Bundle Identifier) the same is as the one provided in the Facebook Web interface. If this is ok, you can proceed to configuring the rest of your project.
For this, the first thing that you need, is to tell XCode which Facebook App this project is related to. This is done in your Info-plist file. Open it and add the following lines:
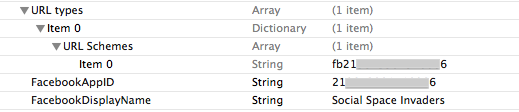
You need to be really careful when doing this, with all the key/values. The value for "FacebookAppID" is the exact AppId that was generated in the FB Web Interface. The value for "FacebookDisplayName" is the Name String that you entered in Facebook. And probably the trickiest one is the "URL types" (pay attention to the space!!). This needs to be configured as an Array. Inside it (at Index Item 0), create a Dictionary. Inside this dictionary, create a key named "URL Schemes" and make it an array. And now, inside THAT array, at Index Item 0, create a string fb<AppID>. Pay attention to the fact that there is no space between fb and your app id.
The next step is to go here and download the current version of the Facebook SDK. Save this to a place where you can find it. (The default path is into the User/Documents/ Folder, but you can change this).
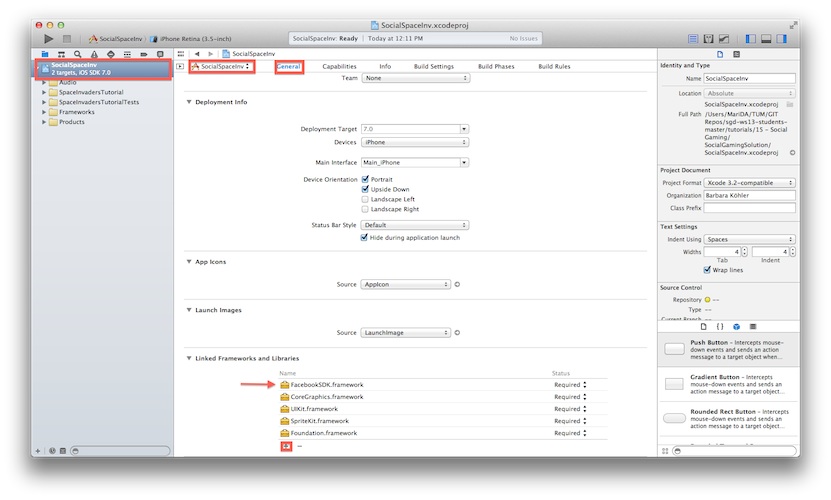
Next step is to adding it to the XCode Project bundle, into the compiled libraries. To do this, select your XCode project, and in your Targets, under General > Linked Frameworks and Libraries, click the + button > Add Other, and navigate to where the SDK was saved. Select the FacebookSDK.framework folder. In the end you should have something like the following:
 After doing this you should be able to run the project without any problems, but that still isn't all of it. The entire Facebook SDK is based on sending Facebook messages, opening the Facebook web interface (or application, when installed/supported), and returning to your own app. In order to do this you need to teach your app how to react to Facebooks responses, which invokes the AppDelegate's -(BOOL)application:(UIApplication *)application openURL:(NSURL *)url sourceApplication:(NSString *)sourceApplication annotation:(id)annotation method. So open your AppDelegate and implement the following:
|
-(BOOL)application:(UIApplication *)application openURL:(NSURL *)url sourceApplication:(NSString *)sourceApplication annotation:(id)annotation{ // Facebook SDK * login flow * // Attempt to handle URLs to complete any auth (e.g., SSO) flow. return [FBAppCall handleOpenURL:url sourceApplication:sourceApplication fallbackHandler:^(FBAppCall *call) { // Facebook SDK * App Linking * // For simplicity, this sample will ignore the link if the session is already // open but a more advanced app could support features like user switching. if (call.accessTokenData) { if ([FBSession activeSession].isOpen) NSLog(@"INFO: Ignoring app link because current session is open."); else [self handleAppLink:call.accessTokenData]; } if (call.appLinkData && call.appLinkData.targetURL) { NSLog(@"We have an incoming URL!"); [[NSNotificationCenter defaultCenter] postNotificationName:@"APP_HANDLED_URL" object:call.appLinkData.targetURL]; } }]; } // Helper method to wrap logic for handling app links. - (void)handleAppLink:(FBAccessTokenData *)appLinkToken { // Initialize a new blank session instance... FBSession *appLinkSession = [[FBSession alloc] initWithAppID:nil permissions:nil defaultAudience:FBSessionDefaultAudienceOnlyMe urlSchemeSuffix:nil tokenCacheStrategy:[FBSessionTokenCachingStrategy nullCacheInstance] ]; [FBSession setActiveSession:appLinkSession]; // ... and open it from the App Link's Token. [appLinkSession openFromAccessTokenData:appLinkToken completionHandler:^(FBSession *session, FBSessionState status, NSError *error) { // Forward any errors to the FBLoginView delegate. if (error) { NSLog(@"%@", error.description); } }]; } |
Basically what is happening above is that, if your application gets invoked from some other (sourceApplication), it should try to process the incoming NSURL, which in our case is done with the Facebook SDK to help us through all the status/error handling.
... aaand that's "it" for the installation! You should now be able to track the status of your current FBSession throughout the entire application. But first we need to understand exactly what is a FBSession.
FBSession
The entire Facebook integration evolves around the FBSession, so for the sake of understanding, let's have a look at it first. When the application is firstly installed (after the above Facebook installation was successful), a FBSession is initialized, with the FBSessionStateCreated status. This FBSession will change state according to the user's interaction and Login/Logout process. You can access the current session's status at any time by using [FBSession.activeSession state]. Once a user taps the "Log In" button, the FBSession state is changed to FBSessionStateCreatedOpening, and only after the autentification process is completed does this change to FBSession StateOpen. If the user cancels the authentication process (through the "Cancel" button) the state will change to FBSessionStateClosedLoginFailed, however, if the user cancels the authentication by pressing the home screen, the state continues the same, and the application should catch this case on itself. Below you can see a general overview of the entire thing.
 The log out process is a bit more simple. If there is a FBSessionStateOpen currently active, you can close this section by calling FBSession.activeSession close]; However, it is important to note that this will save the cache login token, meaning that if the user tries to login again, he will not be required to provide his username and password. In order to close the session and delete the cached token, you need to call [FBSession.activeSession closeAndClearTokenInformation];

In order to initialize a FBSession, we need to login, so let's start implementing the button. The Facebook LogIn Button is an instance of FBLoginView, which automatically initializes a FBSession. Import <FacebookSDK/FacebookSDK.h>
into your ViewController, and declare a strong, nonatomic FBLoginView property, so that we can access the FBSession state from elsewhere. In the following example we named the property fbLoginButton.
|
@property(nonatomic,strong) FBLoginView* fbLoginButton;
|
In the viewDidLoad method, initialize the property with the following code:
|
self.fbLoginButton = [[FBLoginView alloc] init]; self.fbLoginButton.delegate = self; self.fbLoginButton.defaultAudience = FBSessionDefaultAudienceOnlyMe; self.fbLoginButton.publishPermissions = @[@"publish_actions"]; CGFloat screenWidth = [[UIScreen mainScreen] bounds].size.width; self.fbLoginButton.frame = CGRectOffset(self.fbLoginButton.frame, (screenWidth/2 - (self.fbLoginButton.frame.size.width/2)), 280);
|
What this does is that after the initial initialization, we set the View Controller as the Login Delegate (don't forget to implement the FBLoginViewDelegate
protocol in your .h file!) For non-spamming reasons, we set the default audience to OnlyMe (the logged in user), and ask the Facebook server to provide us with publish actions, which in due honesty can be too more than users agree to provide, but we'll need them later on to post things to the timeline. You can read more about Facebook permissions here.
The last two lines of the code above simply adjust the position of the LoginButton on the screen (to in the middle horizontally, and 280 pixels vertically). Feel free to change this around.
If you now run your project now, you should be able to see the blue Facebook button in the desired view. If you click on it, it should ask for your username and password, and upon successful completion of the authentification the application should have a FBSessionStateOpen, and the button should now display "Log Out". However, not much more than that happens.
This is because the application needs to know what to do after it has successfully logged in. You can implement this through two different strategies. If you simply want to add logic to the case where the user logged in/out, you can do this through the delegate callback methods, which were previously declared. These are:
|
-(void)loginView:(FBLoginView *)loginView handleError:(NSError *)error -(void)loginViewFetchedUserInfo:(FBLoginView *)loginView user:(id<FBGraphUser>)user; -(void)loginViewShowingLoggedInUser:(FBLoginView *)loginView; -(void)loginViewShowingLoggedOutUser:(FBLoginView *)loginView; |
Here you can add most of the basic logic you may need, however, in case you want to respond to other FBSession states, you will need to implement the NSNotificationCenter methods. The FBLoginView button will automatically post the following notifications
|
/*! NSNotificationCenter name indicating that a new active session was set */ extern NSString *const FBSessionDidSetActiveSessionNotification;
/*! NSNotificationCenter name indicating that an active session was unset */ extern NSString *const FBSessionDidUnsetActiveSessionNotification;
/*! NSNotificationCenter name indicating that the active session is open */ extern NSString *const FBSessionDidBecomeOpenActiveSessionNotification;
/*! NSNotificationCenter name indicating that there is no longer an open active session */ extern NSString *const FBSessionDidBecomeClosedActiveSessionNotification; |
If you want to respond to any of them, all you need to do is listen to the desired notification through with the following line:
|
[[NSNotificationCenter defaultCenter] addObserver:self selector:@selector(nameOfMethodToBeCalled) name:@”notificationName” object:nil]; |
For more information on how to use Apple's NSNotificationCenter, click here.
Possible reactions you might want to have to a successful log in is to hide the LoginView button (and show it later..), or display the name/photo of the logged in user. This could be done in the loginViewFetchedUserInfo:user: method, for example by calling something similar to
|
NSString *username = user.first_name;
|